Wednesday, April 1, 2015

'Memory gates checking failed because the free memory WCF' FIX: InsufficientMemoryException

You're getting ready to run your WCF service application and you see this error: "Memory gates checking failed because the free memory" populate in your browser.

Memory gates checking failed because the free memory (9338880 bytes) is less than 5% of total memory. As a result, the service will not be available for incoming requests. To resolve this, either reduce the load on the machine or adjust the value of minFreeMemoryPercentageToActivateService on the serviceHostingEnvironment config element.


This exception is simply caused by insufficient memory allocated to the WCF service at the current moment, thus, the application throws an "InsufficientMemoryException." Thankfully, the exception is descriptive enough to provide additional information on solving the issue.

Stack Trace Exception:
[InsufficientMemoryException: Memory gates checking failed because the free memory (9338880 bytes) is less than 5% of total memory. As a result, the service will not be available for incoming requests. To resolve this, either reduce the load on the machine or adjust the value of minFreeMemoryPercentageToActivateService on the serviceHostingEnvironment config element.]

FIX:

In your web.config look under configuration / system.serviceModel / serviceHostingEnvironment element. Add a minFreeMemoryPercentageToActivateService attribute and set it to zero (0). 

 <configuration>  
  <system.serviceModel>  
   <serviceHostingEnvironment minFreeMemoryPercentageToActivateService="0" />  
  </system.serviceModel>  
 </configuration>  

PS: If the serviceHostingEnvironment already exist, simply append/add the "minFreeMemoryPercentageToActivateService" attribute and set it to zero (0). 

Join the discussion on StackOverflow

Wednesday, December 12, 2012

Day and Night Effect Using jQuery

Day and night effect on any html page can easily mean switching between two different stylesheets to enhance user experience. This tutorial will demonstrate how to switch between two stylesheets efficiently using jQuery.

End Result:


THINGS YOU MIGHT NEED:
jQuery basic knowledge
HTML file 
External CSS files

Saturday, November 24, 2012

Getting the window title in AS3

In AS3, you can easily access the name of the HTML page that the .swf is embedded in. To do this, you can use ExternalInterface. First, import the ExternalInterface library.

import flash.external.ExternalInterface;

Next, call the window location from JavaScript using the call function of ExternalInterface.

flash.external.ExternalInterface.call("window.location.href.toString");

This should work for most browsers; however, there have been reported problems using this method. If you experience difficulties with your browser, try wrapping the call in a JavaScript function.

flash.external.ExternalInterface.call("function(){ return window.location.href.toString();}")

In addition, you may want to find the path of the .swf file. Using the following code will get the path of the .swf:

var swfLocation = this.location.href;

One final note, the ExternalInterface calls only work when JavaScript is enabled on the page, so if it does not work, this may be the issue.

Happy Coding,
kieblera5

Thursday, November 8, 2012

How to Center a Page in CSS

Conflicting margins can be frustrating and confusing when constructing a stylesheet for your website. However, centering your website is a common practice to avoid margin conflicts. Centering your website also helps with readability and works pretty well with dynamic display of content.

The following tutorials will show you how to center your website using an ID selector in CSS.

THINGS YOU MIGHT NEED:
CSS basic knowledge
HTML file 
External CSS file

HTML File:

<body>
  <div id="page-wrap">
  all websites HTML here 
  </div>
</body>
External CSS File:

#page-wrap {     width: 800px;
     margin: 0 auto;
}
In other to avoid margin conflicts when resizing your window, it is very important to set the width of the selector to a giving pixel ( e.g 800px ) and also set the margin's initial value to 0 and auto to horizontally center the page.

Monday, March 1, 2010

Dictionary Shortener

Recently, I had to write a program that shortened the dictionary. What I mean by this is that using a full dictionary (over 237,000 words), I needed to weed out the words that were longer than eight letters and shorter than three letters. I needed a list of letters between three and eight letters for an upcoming game that happens to need a dictionary to check against.

Why do I bring this up? Well, my program takes advantage of fstream, a coder's good friend or enemy, depending on your understanding of it.

In my next posting, I will show you the finer points of using fstream, but for now, here is the code for the dictionary shortening program:


#include <iostream>
#include <fstream>
#include <string>
using namespace std;
 
 
int main()
{
    string word;
    ifstream infile;
    ofstream outfile;
    int count=0;
    infile.open("fulldictionary.txt");
    if(infile.fail())
    {
        cout<<"File could not be opened\n";
        system("PAUSE");
        return 0;
    }
    outfile.open("dictionary_short.txt");
    if(outfile.fail())
    {
        cout<<"File could not be opened\n";
        system("PAUSE");
        return 0;
    }
    for(int i=0;!infile.fail();i++)
    {
        getline(infile,word);
        if(word.length()>=3&&word.length()<=8)
        {
            count+=1;
            cout<<count<<": "<<word<<endl;
            outfile<<word<<endl;
        }
    }
    infile.close();
    outfile.close();
    cout<<"There were "<<count<<" words saved in dictionary_short.txt\n";
    system("PAUSE");
    return 0;
}


The above code assumes that you have a file called "fulldictionary.txt" in the project folder and will automatically create the output file. There's no need to make that one.

Friday, February 26, 2010

Creating Road In Unity Game Engine

Unity game engine is a great engine for developing game on PC, MAC, iPhone, and other platforms. However, I noticed that Unity does not have a road editor compared to Torque (game engine). One can use primitives to resolve this issue, but I prefer to use a 3d modeling tool. Thus, in this tutorial I will show you how to create roads using 3ds Max.

THINGS YOU MIGHT NEED:
a) A 3D modeling tool
b) Road Design/Map
c) Road Textures

1) Open 3ds Max, click CREATE and select SHAPES.
(click the picture to view in X-Large)

1b) Enter/Select all the necessary values and settings as desired. (Use the same values and setting to achieve similar results as this tutorial)


2) Create the desired road using the top view.


3) Select the Map Editor. (Shortcut: hit M on the keyboard to pop up the Map Editor)


3b) Click on the none button next to Diffuse. Double Click on Bitmap and select your road texture.


 4)  Make sure the desired material is selected.
4a) Select the "Assign Material to Selection" button in the Material editor to assign material
4b) Select the "Show Standard map in Viewport" to show material layout in your Viewport.
4c) Play Around with the Tiling Values to get the desired tiling.


5) Export as .FBX to Unity Game Engine.


~* By: Verse316 *~

Tuesday, January 5, 2010

Simple Console Program & Code Snippet Embeding.

Happy New Year! There will lots of code altering and editing on this blog this year. Thus, displaying code in code snippets will be very effective. How do you display or embed code snippets on your blog? There are several ways you can embed scripts or code on your blog. One of the easiest ways is to use Microsoft Live Writer. Once you have that installed you may need a plug-in that helps with formatting and highlighting.

Here is an example with a simple Console Program I made:
   1: #include <iostream>

   2: #include <iomanip>

   3: #include <string>

   4:  

   5: using namespace std;

   6:  

   7: int main()

   8: {

   9:     //** Declarations **    

  10:     double hourpay, twoweeks, month, year;

  11:     int ans, weeksWorked;

  12:     string name;

  13:     bool flag = false; 

  14:  

  15:     cout << "Welcome to the Budget Console" << endl;

  16:     cout << endl;

  17:     cout << "Please enter your name: ";

  18:     getline(cin, name);

  19:     system("cls");

  20:  

  21:     cout << name << ", How much do you earn per hour: ";

  22:     cin >> hourpay;

  23:     cout << endl;

  24:     cout << "How much do you work in a week: ";

  25:     cin >> weeksWorked;

  26:     cout << endl;

  27:     system("cls");

  28:  

  29:     //** Menu **

  30:     while (!flag)

  31:     {

  32:     cout << "\t Menu" << endl;

  33:     cout << "1) Calculate how much I earn in 2 weeks."<< endl;

  34:     cout << "2) Calculate how much I earn in a month."<< endl;

  35:     cout << "3) Calculate how much I earn in a year: ";

  36:     cin >> ans;

  37:     cout << endl;

  38:  

  39:     //** Calculation **

  40:      twoweeks = hourpay * weeksWorked;

  41:      month = twoweeks * 2;

  42:      year = (twoweeks * 2) * 12;

  43:  

  44:     //** Outputs **

  45:     if (ans == 1) {         

  46:           cout << "Your Two Weeks Pay: $" << twoweeks << ".00 " << endl;

  47:           flag = true;

  48:     }

  49:     else if (ans == 2) {        

  50:         cout << "Your a month Pay: $" << month << ".00 " << endl;

  51:         flag = true;

  52:     }

  53:     else if (ans == 3) {        

  54:         cout << "Your a month Pay: $" << year << ".00 " << endl;

  55:         flag = true;

  56:     }

  57:     else {

  58:       cout << "Invalid Selection" << endl;

  59:     }

  60:       }

  61:     system("pause");

  62:     return 0;

  63: }

Tuesday, December 22, 2009

Colored Output in C++ Console

Greetings!

I know I'm a day late, but there was a family emergency yesterday.

Our next topic is colored output in C++.
Have you ever wanted to get away from the boring white text on black background in console output? Well, I have an easy solution for you ;)

There is a wonderful function called SetConsoleTextAttribute. This function can set the output handle and the colors of the output (background and foreground).

It is a very easy function to use. Here is an example of the function:

SetConsoleTextAttribute(GetStdHandle(STD_OUTPUT_HANDLE), 
BACKGROUND_INTENSITY | BACKGROUND_RED | BACKGROUND_GREEN | BACKGROUND_BLUE);

First, the function keeps the output to the standard output (cout), then come the colors. There are three options for color in both foreground and background.

BACKGROUND_RED

BACKGROUND_GREEN

BACKGROUND_BLUE

FOREGROUND_RED

FOREGROUND_GREEN

FOREGROUND_BLUE


Use these as flags in the second part of the function's parameters, seperated by vertical lines (Shift+\).

If you are changing the background or foreground colors, you must also put:

FOREGROUND_INTENSITY
or
BACKGROUND_INTENSITY

depending on which color you are changing. The example function above changes the output to a white background (using all colors), with the "default" foreground (black). The color defaults to black when you do not choose it, if you use this function.

I used this function plenty to make a simulation program that included quizzes. I changed the colors of the incorrect or correct answers to visually stimulate the user.

One more thing: You need to include the windows.h header for this code to work. Use the following line in your code:


#include "windows.h"

I will upload test code when I can and link it to this post.


Until then,
Happy Coding!
kieblera5

Monday, December 14, 2009

Intro to HTML with notepad

It's very interesting how a notepad utility can serve as an editor for your website or blog.
Kiebler5 did a great job by describing the various uses of "namespace" in c++; However, this intro to HTML is intended to give beginners a feel of what programming looks like. (ps. HTML is not a programming laguage, it is a markup language)

HTML is a language for describing web pages.

* HTML stands for Hyper Text Markup Language
* A markup language is a set of markup tags
* HTML uses markup tags to describe web pages

I will show you how to create and run a simple html page. [click on images to enlarge]
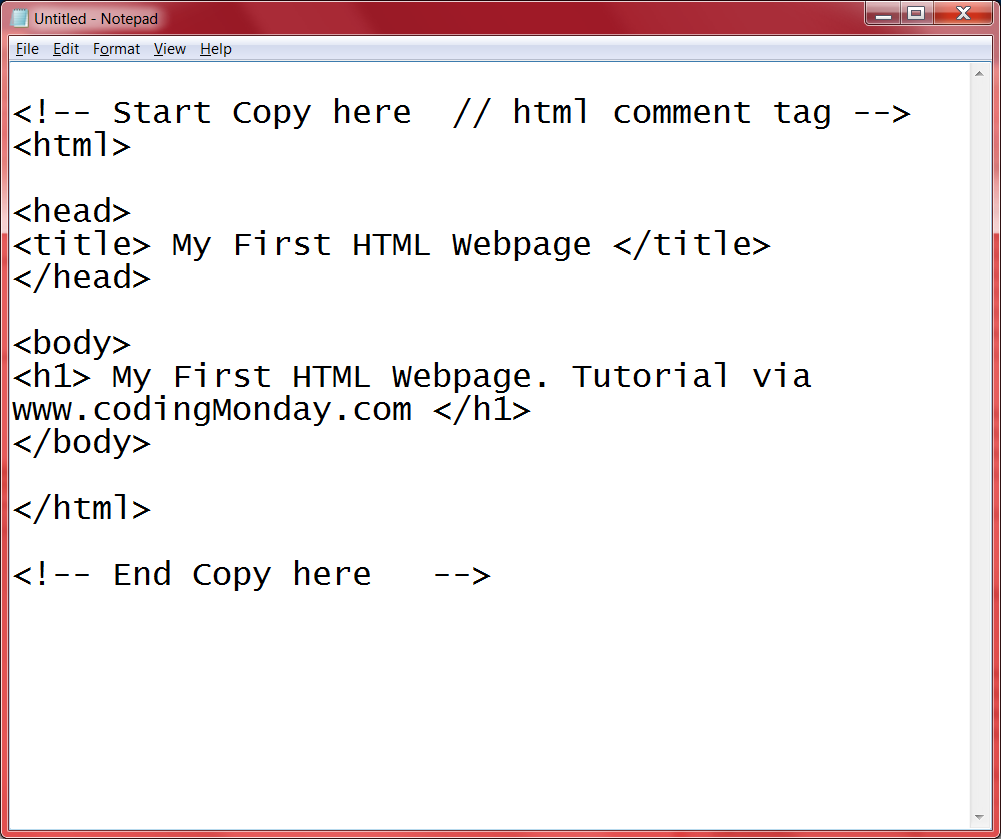
Step. 1) Open notepad.
(Quick way to open notepad - hit Ctrl + R - and type "notepad" in the dialog box and hit "OK".)
Snapshot 1:
Step. 2) Type your own HTML code or copy this code into your notepad.
Screenshot 2:
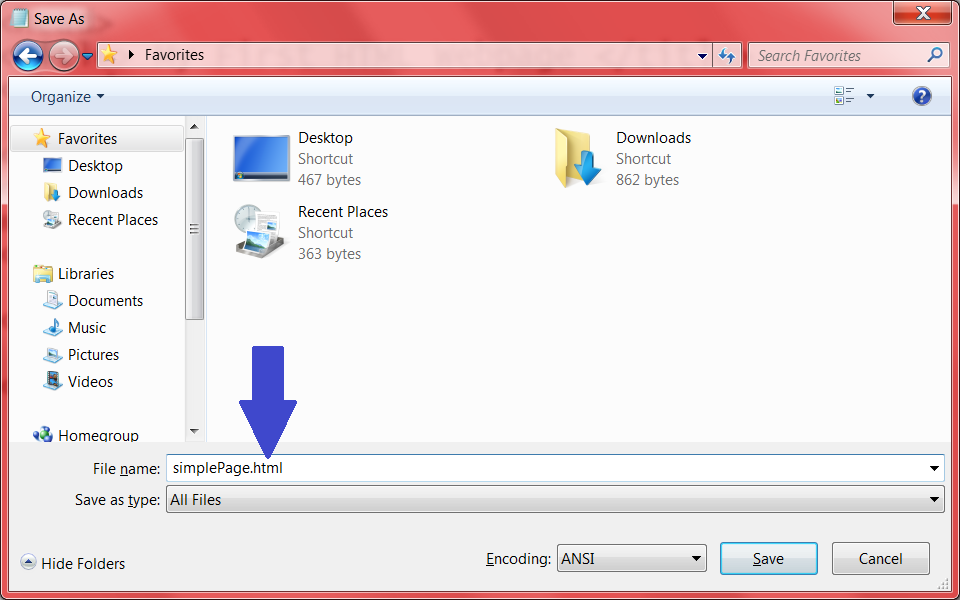
Step. 3) Save the txt file as a .html format. This step is very important. This is because without the HTML extension your operating system may detect the file as a txt file.
In snapshot 3, I saved my html code as "simplePage.html".
Screenshot 3:
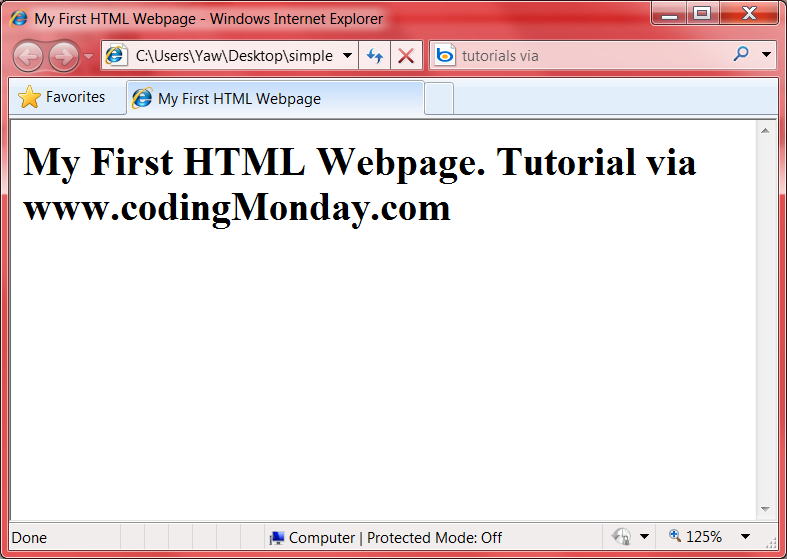
Step. 4) Locate your and run your html file.
Screenshot 4:
Next, Intro to CSS.
Until then,
Happy Coding
Verse316

Namespaces in C++

So... The first topic that I would like to discuss the topic of namespaces in C++. What is a namespace? Well, it's a way to group classes, objects and functions all under one name.

For instance:

namespace myNamespace
{
int x;
}


To access the variable inside the namespace, we can use the code namespace_name::variable_name:


myNamespace::x

So, now that you know somewhat about namespaces, let's get to the reason that I brought this up. Certain C++ programmers, when using a cout statement, like to use:


std::cout<<"Hello World!\n";

They put the namespace tag of std in front of the cout. A better way to do this is to say at the beginning of the code:


using namespace std;
//more code here
cout<<"Hello World!\n";

This way, you don't need the std tag. You could see how many extra strokes it would take to put std:: in front of every cin and cout? So, why do people do it? Well, the only real reason is that when you say "using namespace std;", you are including EVERYTHING in the std namespace. Maybe you don't want everything to be included. You could always say:


using std::cout;

This would replace putting the std:: tag in front of every cout; however, you wouldn't be using the entire namespace and then you wouldn't have to worry about possible class name-clashing in the future. See if there is something already named, you can't make a class with the same name yourself. For instance, if you try to make a Time class, it might not work depending on your include statements. I had this problem once and had to rename the class.

Other good things from namespaces to include: There are a lot of different things in the std namespace that can all be found at this link: http://www.cplusplus.com/reference/

Every one of those items is included when you use the std namespace. The best things, in my opinion, are the functions in cctype. If you include cctype with the following code:


#include <cctype>

,then you can have access to functions like toupper, tolower, isalpha, isdigit, etc. These functions can tell you about characters and return if the character is a number, letter, space, uppercase, lowercase, etc. and can also change a character from a lower to an upper and vice-versa.

Well, there you have it. That's the low-down on namespaces. Remember, you can create your own namespaces! Just follow the code outlined near the beginning. And if you are one of those people that use std:: before every cout and cin, start using "using std::cout" and "using std::cin" at the beginning of your code after the includes.

Next update from me? Changing colors in standard C++ console output :)

Until then,
Happy Coding,
kieblera5

Welcome!

#include "Blogger.h"

using quickIntro lol;

int codingMonday()
{
cout << "Welcome to codingMonday!!!" << endl;
cout << "Brief History: CodingMonday is a day created by two bored college students that happen to like programming\n";
cout << "Each Monday, we will discuss a random, yet useful, topic on C++, C#, or any other language or technology"<< endl;
cout << "These topics will be accompanied with explanations and source code files for you, the reader, so that you can see the actual code instead of just talk and theory.\n";

return 0;

}

Enjoy,

Verse316 and kieblera5